Showing posts with label linux. Show all posts

Monday, April 26, 2010

लिनक्स, विंडोज आणि कुसुमाग्रज

Linux आणि Windows या दोन Operating systems आहेत हे आपल्याला माहिती असेलच. Windows वापरणारे आणि linux वापरून पुन्हा नाईलाजास्तव windows platform वर परतावं लागलेले लोक windows ला किती दात-ओठ खाऊन नावं ठेवतात त्याचीही आपल्याला कल्पना असेल. पण मी आत्ता जो एक वेगळा angle तुम्हाला सांगणार आहे तो मात्र नक्कीच तुम्हाला नविन असेल याची खात्री आहे मला.

मराठीचा अभ्यास ज्यांनी केलाय किंवा ज्यांना साहित्याची थोडीफार का होइना जाण आहे, त्यांना कुसुमाग्रजांच्या कविता माहित असायला काही हरकत नाही. आता तुम्ही म्हणाल linux/windows आणि कुसुमाग्रजांच्या कविता यांचा काय संबंध आहे? संबंध आहे. कुसुमाग्रजांच्या कवितांचा कुठलाही पूर्वग्रह न ठेवता बारकाईने अभ्यास केल्यास असं दिसून येईल की, तुमच्या-आमच्या सारख्या मर्त्य मानवांनाच नाही तर कुसुमाग्रजांसारख्या दैवी कवीला देखिल windows चा प्रचंड उबग आला होता अणि त्यांचं सुद्धा linux वर खूप प्रेम होतं.

एक उदाहरणच घ्या ना. त्यांच्या 'पृथ्वीचं प्रेमगीत' या कवितेमधलं एक कडवं पहा -

'परि भव्य ते तेज पाहून पूजून
घेऊ गळ्याशी कसे काजवे
नको क्षुद्र शृंगार तो दुर्बळांचा
तुझि दूरता त्याहुनी साहवे'

आता वर वर पाहता हे एक प्रेमगीत वाटतं. पृथ्वीनं सूर्याला लिहिलेलं. कुसुमाग्रजांनी कवितेला नावही तसंच दिलंय पहा. जेणेकरून कुणा सोम्या-गोम्याला संशय येऊ नये. पण खरा अर्थ लावायचा झाला तर कुसुमाग्रजांनी या ओळी linux ला संबोधून लिहिल्या असाव्यात असं दिसतं.

पहिल्या ओळीत ते म्हणतात -
'परि भव्य ते तेज पाहून पूजून'

कुसुमाग्रज linux च्या stability, reliability, developer-friendliness, opensource philosophy यांसारख्या गुणांनी किती प्रभावित झाले असावेत ते यावरून लक्षात येतं. पुढं जाउन ते विचारतात की linux मधे एवढे सगळे गुण असताना -

'घेऊ गळ्याशी कसे काजवे'

इथं 'काजवे' म्हणजे windows असा अर्थ त्यांना अभिप्रेत असावा. Linux एवढं powerful आणि reliable असताना, windows सारखी powerless, buggy, closed-source आणि monopolistic system कशी वापरायची असा साहजिक प्रश्न ते विचारतात आणि म्हणतात -

'नको क्षुद्र शृंगार तो दुर्बळांचा'

इथं दुर्बळ म्हणजे पुन्हा windows. घडीघडीला छोट्या छोट्या कारणांवरून crash आणि restart होणार्‍या windows ला ते अतिशय मर्मिकरित्या दुर्बळ म्हणून संबोधतात. त्याही पुढे जाऊन ते windows ने पुरवलेल्या भड़क graphical effects, GUI, screen-saver अशा डोळ्यांचं समाधान करणार्‍या पण व्यावहारिक जीवनात काडीचाही उपयोग नसणार्‍या facilities ना 'क्षुद्र शृंगार' अशी शेलकी उपमा देऊन म्हणतात -

'तुझी दूरता त्याहुनी साहवे'

म्हणजे linux जरी तिकडं दूर अमेरिकेतल्या server वर run होंत असेल आणि इथून भारतातून त्या linux server ला connect करायसाठी जरी PuTTY चा वापर करावा लागत असेल तरीही दुर्बळांच्या (windows च्या) क्षुद्र शृंगारापेक्षा (भड़क GUI पेक्षा) ते तेजःपुंज आणि powerful असं PuTTY चं काळं command-line terminal केंव्हाही बेहेत्तर! या ओळीवरून कुसुमाग्रजांनी त्याकाळात देखिल उत्सुकतेपोटी अणि linux प्रेमापोटी PuTTY वापरून दूरदेशीच्या एखाद्या linux server ला connect केलं असण्याची दाट शक्यता वाटते. असो.

या खळबळजनक संशोधनाबद्दल वाचल्यानंतर तुमच्या मनात या संशोधाकबद्दल नितान्त आदर निर्माण होणं साहजिक आहे. पण तुम्हाला हे वाचून आश्चर्य वाटेल की या गुणवान संशोधकाला बारावीच्या परीक्षेत मराठीमधे १०० पैकी ३५ गुण मिळाले होते. IT field मधे दिवसभर घाम गाळुन काम करणार्‍या, आणि थकून-भागून घरी आल्यानंतर देखिल अथक संशोधन करून कुसुमाग्रजांच्या कवितांकडे बघण्याची एक वेगळी नजर जगाला देणार्‍या होतकरू मराठी अभ्यासकाला बारावीसारख्या महत्वाच्या वर्षी मातृभाषेच्या परीक्षेत काठावर उत्तीर्ण करणार्‍या त्या परिक्षकाचा धिक्कार असो! आईनस्टाईनला सुद्धा लहानपणी गणितात खुप कमी गुण मिळायचे म्हणे. पण तो निदान तिकडं यूरोपात तरी होता. इथं भर महाराष्ट्रात झालेल्या या एका मराठी-भाषिकाच्या गळचेपिचा मुद्दा राज ठाकरेंनी संसदेत उपस्थित करावा अशी माझी इच्छा आहे. असो. यावर परत केंव्हा तरी बोलू.

तर हा लेख वाचल्यानंतर तुम्हाला हिंसाचार करायची बुद्धि झाल्यास तो बौद्द्धिक पातळीवर करावा. ज्यावर हा लेख वाचताय तो संगणकही तुमचाच आणि तुमच्या डोक्यावरचे केसही तुमचेच हे ध्यानात असुद्या.


टीप:
या कवितेतील इतर कडव्यांचे अणि कुसुमाग्रजांच्या इतर कवितांचे linux अणि windows शी संबंधित अन्वयार्थ - यावरपुढील संशोधन सुरु आहे. या घडीला या एका कडव्याशिवाय इतर काही प्रकाशित करता येणार नाही. संशोधन पूर्ण होताचयोग्यवेळी सर्व गोष्टी उघड करण्यात येतील. चिकित्सा करण्याचा मोह आवरल्याबददल धन्यवाद.


Friday, April 24, 2009

Connecting to Internet on Ubuntu using GPRS on HTC PDAs

I own an awesome O2 XDA Orbit (base model - HTC P3350) PDA which has kept me satisfied with its features for almost last 2 years. Coupled with a fantastic GPRS plan from Idea (with really good connection speeds, I admit), it was very easy for me to remain connected  24x7. When my laptop had Windows (OEM version that came with my Dell Vostro), the internet connection sharing feature on the PDA allowed me to use GPRS internet on my laptop whenever I visited Sangli. Windows used to automatically configure itself to use this GPRS internet (I didn't like it though, as these things were happening without me knowing any details).

Then came a day when I got frustrated enough with Windows, and destroyed windows (with all its partitions) once and for all, from my laptop, and installed 3-4 different linux flavours instead. That (golden) day was Sunday 8 March 2009.

Since then, I have never missed windows again, but for some exceptions like iTunes, which is just not available on windows (see my previous post about this - iTunes for Ubuntu) or configuring different networking interfaces (like autoconnecting to wireless networks). Connecting to GPRS internet connection provided by my PDA to Ubuntu, had been one such problem that I didn't have a clue about.

The solution, though, turned out to be pretty simple. There are two ways to share Internet Connection from a windows mobile 6 device, like my O2 XDA Orbit -
  1. USB
  2. Bluetooth PAN

USB Connection (RNDIS)


What is needed is an RNDIS (Remove Network Device Interface Specification) driver on Ubuntu.
So get the sources of one such driver, build it and install the kernel module -

shreyas@ghatotkatch:~$ svn co https://synce.svn.sourceforge.net/svnroot/synce/trunk/usb-rndis-lite
shreyas@ghatotkatch:~$ cd usb-rndis-lite
shreyas@ghatotkatch:~/usb-rndis-lite$ make
shreyas@ghatotkatch:~/usb-rndis-lite$ sudo ./clean.sh
shreyas@ghatotkatch:~/usb-rndis-lite$ sudo make install


Then edit the network interface file -

shreyas@ghatotkatch:~/usb-rndis-lite$ sudo emacs /etc/network/interfaces

Add following entries to the interfaces file -

auto rndis0
iface rndis0 inet dhcp


Save the file and restart your network interfaces -

shreyas@ghatotkatch:~/usb-rndis-lite$ sudo /etc/init.d/networking stop
shreyas@ghatotkatch:~/usb-rndis-lite$ sudo /etc/init.d/networking start


That's it. Now on your WM6 PDA, select Start>Programs>Internet Connection Sharing.
I assume you have already configured GPRS on your PDA. So in the Internet Connection Sharing app, select USB as PC-Connection type, and click Connect. Now connect your PDA to the USB port.

The RNDIS connection should be automatically configured and the rndis0 interface should have got an IP address. To check this, run /sbin/ifconfig command, and verify the rndis0 interface.

Reference - http://forums.opensuse.org/1579065-post1.html


Bluetooth PAN

It has been my experience that Bluetooth PAN (Personal Area Network) slows down the internet connection a bit (as compared to connecting to USB) and also eats into the device battery.

Anyway, to configure a Bluetooth PAN on Hardy Heron (8.04), you need to install atleast following packages -

shreyas@ghatotkatch:~$ sudo apt-get install bluez bluez-compat

The network interfaces file will need to be edited -

shreyas@ghatotkatch:~$ sudo emacs /etc/network/interfaces

Add a new interface for our Bluetooth PAN -

auto benp0
iface benp0 inet dhcp


Then add the bnep module to the kernel. This module takes care of the Bluetooth PAN interface. By the way, BNEP stands for Bluetooth Network Encapsulation Protocol.

shreyas@ghatotkatch:~$
sudo modprobe bnep

Now select Bluetooth PAN as PC Connection type in internet connection sharing app on your PDA, and try to find the PDA from your laptop / PC - 

shreyas@ghatotkatch:~$ hcitool scan
Scanning ...
    00:17:E5:3F:BE:E8    hexaM!ner


Use the hex string to connect to the PAN network -

shreyas@ghatotkatch:~$ sudo pand --connect 00:17:E5:3F:BE:E8


That's it. You should be connected, and your bnep0 interface should have got a brand new IP address. You can verify it using /sbin/ifconfig.

Reference: This article on samiux.wordpress.com


Technorati Tags: , , , ,

Sunday, April 12, 2009

VirtualBox VM with Host Interface Setup on Debian Lenny

For sometime now I had been wishing for a debian virtual machine which can talk to the host - another debian or a ubuntu. If you have used VirtualBox on debian/ubuntu before, I am sure you know NAT is the easiest type you can setup in VirtualBox OSE; while Host Interface configuration is probably the toughest to figure out on your own, especially if you are not used to setting up bridges and stuff. But necessity is mother of reasearch, for engineers. So after a day of struggle I have finally got what I wanted. Here I share with you not only the installation of virtualbox ose in a trouble free manner, but also the simplest way host interface can be configured.

Installing virtualbox on ubuntu turned out to be a breeze for me, as I used the VirtualBox package directly from the virtualbox website. On my Debian Lenny 5.0 though, the DVDs installed VirtualBox-OSE v1.6x which is the open-source-edition; and totally inline with the debian tradition and philosophy. Since I am becoming more and more inclined towards this total-GPL thingy, I decided to set up this GPLed virtualbox only, come what may. I hear Virtualbox v2.1 makes things a lot easier though, just in case you wanna try.

To start with, first I installed the virtualbox-ose packages.
mrutyunjay:~$ sudo apt-get install virtualbox-ose virtualbox-ose-modules module-assistant

module-assistant is required for setting up 'vboxdrv' module required by virtualbox.

Once the installation is through, auto-install the vboxdrv module using module-assistant.
mrutyunjay:~$ sudo m-a prepare
mrutyunjay:~$ sudo m-a -f get virtualbox-ose
mrutyunjay:~$ sudo m-a a-i virtualbox-ose
mrutyunjay:~$ sudo modprobe vboxdrv


Add yourself to the 'vboxusers' group (so that virtualbox can access vboxdrv)
mrutyunjay:~$ sudo adduser username vboxusers

Check your 'kernel' argument list in /boot/grub/menu.lst. Just in case it has something like nmi-watchdog in it, remove that portion. (Mine didnt have this). This is to avoid one of the most commonly observed troubles while setting up virtualbox.
Check if 'vboxdrv' module was loaded successfully -
mrutyunjay:~$ dmesg | grep vboxdrv

You should see a success message, like the one below -
[ 1883.765045] vboxdrv: Successfully loaded version 1.6.6_OSE (interface 0x00080000).

If you get the above message, you are done with the first part. Now reboot your system (relogin should do as well).

Host Interface Configuration

For setting up Host Interface, we will need to install bridge-utils package.
mrutyunjay:~$ sudo apt-get install bridge-utils

There are at least two ways to setup the bridge which will enable the host to talk to guest, and vice versa. One is to set a simple bridge definition in /etc/network/interface file. The other is to write setup and cleanup scripts for bridge and TAP interfaces (using VBoxTunctl and brctl); and then run these scripts before and after start-stop of the virtual machine. Out of these, the first approach of modifying the  /etc/network/interface file, is easiest one and gets the job done in short time.

To setup the bridge, first you need to create a permanent TAP interface for virtualbox. Open the /etc/vbox/interfaces file -
mrutyunjay:~$ sudo emacs /etc/vbox/interfaces

Add following definition to it -

vbox0 username br0

Goes without saying that you should replace 'username' with your user name in the above definition.
Here br0 is the name of the bridge that we are going to setup now.

Open the /etc/network/interfaces file for editing.
mrutyunjay:~$ sudo emacs /etc/network/interface

Add following bridge definition to the file -

auto br0
iface br0 inet static
      address 10.0.0.1
      netmask 255.255.255.0
      bridge_ports vbox0


You can customize the IP address and netmask. I have set it up to be static, for simplicity.

Now that we are done with network interface settings, time to restart both the networking interfaces -
mrutyunjay:~$ sudo /etc/init.d/networking restart
mrutyunjay:~$ sudo /etc/init.d/virtualbox-ose restart


Our 'vbox0' TAP interface requires bridge 'br0' defined before it gets attached to the bridge. So make sure you dont alter the order above.
After restarting network interfaces, ensure that our TAP and bridge interfaces are up and running, using /sbin/ifconfig. It should show 'br0' with above entered IP address and 'vbox0' without any IP address.
We enter this TAP interface name (vbox0) in virtualbox network configuration. Set the network to Host Interface and enter vbox0 as interface name and start the virtual machine.

Guest VM Setting (linux flavour)


I had lightweight text-mode debian lenny 5 as my guest VM. So I will explain the network setting accordingly. But for any other linux flavours, network setting should be on these lines only.

Here in the guest VM, you need to setup the networking interface eth0 to be aware of 10.0.0.1 bridge. The bridge is your host machine.
So add following information to your /etc/network/intertface file -

shaunak:~$ sudo emacs /etc/network/interface

iface eth0 inet static
    address 10.0.0.2
    netmask 255.255.255.0
    network 10.0.0.0
    broadcast 10.0.0.255
    gateway 10.0.0.1


And finally, restart networking -
shaunak:~$ sudo /etc/init.d/networking restart

That's it! Now try pinging your bridge 10.0.0.1 from VM and vice versa -

shaunak:~$ ping -c3 10.0.0.1

mrutyunjay:~$ ping -c3 10.0.0.2

If both the pings are successful, YO!, your network is up and running.


Sunday, March 15, 2009

iTunes for Ubuntu

Since long I have been finding a replacement for iTunes on Ubuntu, but in vain. I don't want to use CrossOver Office as it's proprietary, and don't want to install the bloated Windows Vista in VirtualBox and waste many GBs of storage just for the sake of one iTunes. Since making the switch to Ubuntu/Kubuntu twins, I haven't missed Windows at all. In fact, now I am realising what I was missing with OEM windows running on my Dell laptop. Nowadays, I feel disgusted even at the thought of going back and installing Windows.

The next thing on my agenda is of-course trying to get iTunes running through Wine, though, I have read pretty many comments about problems in this approach. I am not very positive about it.

That leaves me with the thought - why doesn't Apple come out with an iTunes version for ubuntu (or linux in general)? Especially when Ubuntu has gone mainstream with a bang, with many hardware manufactures (like Dell) shipping their units with Ubuntu. Though I don't know exact figure of ubuntu users, given the life in the ubuntu community and forums, it's easy to guess that there is a sizeable amount in there.

If you are an ubuntu user, and you think on the similar lines, I request you to sign the iTunes for Ubuntu Petition.

There are currently 2000 odd signatures there. It doesn't take time to sign the petition. Every sign will help, so please sign the petition.


Saturday, March 14, 2009

Skype / Ekiga on Ubuntu 8.04 Hardy Heron

As GTalk doesn't support Linux for VoIP communication, I needed some alternative VoIP software, that works well on Ubuntu. There were couple of them Ekiga and Skype.

Ekiga comes pre-installed in Hardy. So I started with Ekiga and registered for a SIP address on ekiga.net. But unfortunately, ekiga failed to communicate with sound hardware on my Dell Vostro 1500 laptop. So I downloaded Skype for Ubuntu. Same story.


So I searched the net, and finally got it working. It turned out that the pulseaudio package was the culprit. Skype and Ekiga both don't work with pulseaudio. They work with esound package. So I decided to remove pulseaudio and install esound instead. Before removing pulseaudio, I disabled PusleAudio Session Management from System->Preferences->Sessions.


And then -

killall pulseaudio
sudo apt-get remove pulseaudio
sudo apt-get install esound

On some setups (probably on intrepid), it might be required to remove a file from /etc/X11/Xsession.d so that the Ubuntu login process doesn’t break.

sudo rm /etc/X11/Xsession.d/70pulseaudio

This is not required on Hardy though; there is no such file in Hardy. I think disabling of PulseAudio Session Management, does the trick instead.

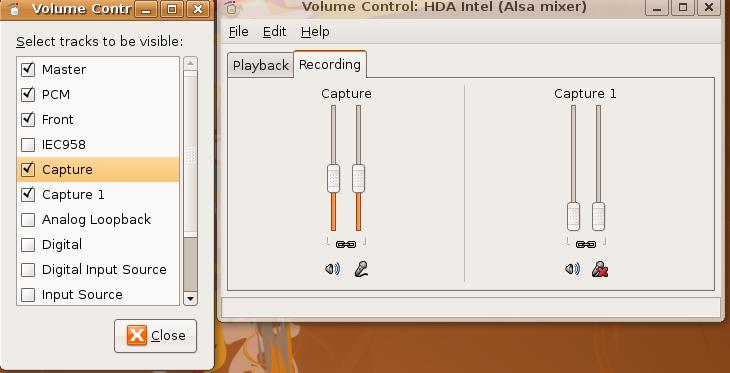
After installing esound, and restarting both skype and Ekiga, though I could hear Ringing, and Sound Outs from Skype, the mic was still not working in test call. Then after playing with the system for sometime I realised that the mic was muted. I had to enable mic boost control from Volumn Control->Edit->Preferences and tick Capture and Capture-1.


And then, when I un-muted the mic, skype worked flawlessly. And after skype, Ekiga also started working when I set Audio In and Audio Out devices to HDA Intel.


Interesting Part

Now, here is the interesting part. After playing around with skype and ekiga for a lot of time, I came to know that I had an uninterruptible process (elisa media player) parented by a python zombie process. I rebooted the system, since there is no other effective way to get rid of these zombies, and elisa was consuming 100% of my CPU2 (at least that's what the system monitor reported).

Ubuntu got stuck during reboot, I am not sure for what reason. So I had to power the system off. When I powered it back up again, I could login and there were no error messages related to pulseaudio. But the UI was totally unresponsive, as if it has hanged. iThen I switched back to command line mode using CTRL-ALT-F5, logged in, removed esound and reinstalled pulseaudio.

sudo apt-get remove esound
sudo apt-get install pulseaudio
sudo reboot


And after reboot, the UI was back to life again. So it was the pulseaudio which caused this freeze. Out of curiosity, I started Skype and made a test call. And to my surprise, both mic and audio playback worked!!! Now this was not expected, as skype initially refused to work with pulseaudio. So did ekiga.

I started the PulseAudio Session Management as well, still Skype and Ekiga worked perfectly.


Conclusion

It seems that, on Hardy, Skype and Ekiga, both work with pulseaudio, and it was probably due to  the zombie process of elisa media player hogging the sound device that caused problems with audio playback and mi, in Skype/Ekiga.

So finally, it seems that, on Ubuntu 8.04 Hardy Heron, you don't need to remove anything or install anything, to get Skype and Ekiga working!!! And this whole post of mine turns out to be a pure waste of time and energy!!!! :(


An Update -

Just in case somebody is interested, there is a very informative post about pulseaudio and how to get it working, on ubuntuforums.org - HOWTO: PulseAudio Fixes & System-wide Equalizer Support


Technorati Tags: , , , , ,

Sunday, March 1, 2009

Setting up Debian APT behind Proxy Server

Setting APT to run behind a proxy server is a pretty easy and quick procedure. Login as root user, and then All you need to do is set http_proxy environment variable in http://username:password@proxy.server.com:port_no/ format.

debian:~# export http_proxy='http://shreyas:myPassword@myproxyserver.co.in:8080/'
debian:~# echo $http_proxy
http://shreyas:myPassword@myproxyserver.co.in:8080/
debian:~# cat /etc/apt/sources.list
#
deb http://ftp.us.debian.org/debian/ etch main
debian:~# apt-get update
Err http://ftp.us.debian.org etch Release.gpg
Could not resolve myproxyserver.co.in
Ign http://ftp.us.debian.org etch Release
Ign http://ftp.us.debian.org etch/main Packages/DiffIndex
Err http://ftp.us.debian.org etch/main Packages
Could not resolve myproxyserver.co.in
Failed to fetch http://ftp.us.debian.org/debian/dists/etch/Release.gpg Could not resolve myproxyserver.co.in
Failed to fetch http://ftp.us.debian.org/debian/dists/etch/main/binary-i386/Packages.gz Could not resolve myproxyserver.co.in
Reading package lists... Done
E: Some index files failed to download, they have been ignored, or old ones used instead.
debian:~#

Here as the proxy server address is fictitious, apt reports an error. But that's not the point really. The point is, if you observe, what apt does with the http_proxy URL is, it separates out the host (in this case, myproxyserver.co.in) from the URL. And how does it do that? Simply by finding '@' sign in the http_proxy URL and then taking the part from '@' to ':'.

This is fine, but only as long as our password is plain alpha-numeric. The moment password contains a special character, like an '@', this whole thing goes for a toss.

debian:~# export http_proxy='http://shreyas:my@Password@myproxyserver.co.in:8080/'
debian:~# echo $http_proxy
http://shreyas:my@Password@myproxyserver.co.in:8080/
debian:~# apt-get update
Err http://ftp.us.debian.org etch Release.gpg
Could not resolve Password@myproxyserver.co.in
Ign http://ftp.us.debian.org etch Release
Ign http://ftp.us.debian.org etch/main Packages/DiffIndex
Err http://ftp.us.debian.org etch/main Packages
Could not resolve Password@myproxyserver.co.in
Failed to fetch http://ftp.us.debian.org/debian/dists/etch/Release.gpg Could not resolve Password@myproxyserver.co.in
Failed to fetch http://ftp.us.debian.org/debian/dists/etch/main/binary-i386/Packages.gz Could not resolve Password@myproxyserver.co.in
Reading package lists... Done
E: Some index files failed to download, they have been ignored, or old ones used instead.
debian:~#

Now if you observe, because of the '@' in password, apt thinks the username is 'shreyas', password is 'my' and the host is 'Password@myproxyserver.co.in'!! Try using escaping the '@' with a '\' and you will still get the same result.

This is the problem I had been facing since last couple of days. Few of the other guys have also reported this problem in other debian and ubuntu forums, and it's around for almost an year now. It has also been filed in Debian Bug Tracking System (BTS) as bug #500560.

Though this might seem as a rare occurrence, passwords with special characters are a norm in password policies of several organizations, as it is with mine. So I had no option but to either say goodbye to Debian, or fix it myself. And given the regard and love I have towards Debian, I had to at least have a go at fixing the bug. Saying goodbye to such a fantastic distro just because of this minor problem would have been very painful.

Bugfix for APT Bug #500560

And the bug is fixed! As I said, what APT used to do was to look for '@' and a ':' just after that to resolve the Host from http_proxy URL.

After the bugfix, now APT supports escape character '\' before '@'s and ':'s, formulates the correct password. For example, if your password contains an '@' character, all you need to do is prefix the '@' with a '\' while exporting the http_proxy environment variable.

debian:~# export http_proxy='http://shreyas:my\@Password@myproxyserver.co.in:8080/'
debian:~# echo $http_proxy
http://shreyas:my\@Password@myproxyserver.co.in:8080/
debian:~#

I have prepared this bugfix patches for both Lenny and Etch distributions. And they are available at my bugfix post.

For ready reference, here are the cross links to the patch files – 

  1. Debian Lenny - Bug #500560 Patch for APT v0.7.20.2

  2. Debian Etch - Bug #500560 Patch for APT v0.6.46.4.1

These patches have been tested on a Debian 'etch' 4.0 r4a distro running on a Dell Vostro 1500 latop (core 2 duo, 2GB).

Please report if you face any issues with the patches.